Sunday, 20 December 2015

One post this year? Not good! Welcome back, Me!


One post in January ... and it's now December ... what a year! And it's almost over. 

Highlights of the year for me would be the two (almost three) months I spent at our van near Batemans Bay. 
Kangaroos on the beach at North Durras
Rock ripples at Pebbly Beach


Henry would be an inside boy if he could ...

Kangaroos love apple. Pear is now gone, but her son Henry kept me company for the many weeks I was there.


One of Henry's buds!

A lovely seafoam on one of the beaches at Batemans Bay.


During my time there, I car-tripped on down to Eden, just three hours from Batemans Bay, and found I think, the town of my heart. 
Going into Eden ...

Calle Calle Bay, Eden, Far South Coast, NSW


Looking north ...
Looking south ...


Beautiful views from the hotel verandah out over Calle Calle Bay.

Have you ever been to a place that you drove into and thought ... 'Home'! And you drove out of with tears rolling down your face? That was Eden for me!


Staying in a pub was great for the views, but not so good in other respects.


What a beautiful place ... no matter where you go in Eden, you have sea views out into the Tasman on one side and into the bay on  the other.


Beautiful early morning views ...


Wrought ironwork on the pub's verandas
One of the two main lookouts ... this one looks back in to Nullica Bay ...


Eden is a stopover for our whales ... the waters there are rich in krill and the small fish eaten by the baleen whales. they travel up the coast around May, to birth their calves in the warm waters of the Great Barrier Reef, then travel more slowly south again, bringing their young with them, on their way to the cool waters of the Southern Ocean for the southern summer. 


 Moon over Nullica Bay, Eden ...
Rainbow over Nullica Bay ...


While I was there in September, I was lucky to catch the first of the southern travellers out in Calle Calle Bay. Apart from wanting a bigger lens, I felt very lucky to see them. 
Yes, that's a whale ...

Humpbacks and Southern Right Whales have different blow patterns ... a Southern Right Whale has two blowholes and the spray is V-shaped apparently ... how on earth would you know?


I will end this post, as I've lost the text cursor ... have no clue how to get it back! Arrgghh ... I will never be computer savvy!


Saturday, 17 January 2015

Etsy ~ SeaLights is open again ...

No, that's not a big hint for anyone who visits my blog to go visit my Etsy store .... I'm just very happy to have it open again!

For a long while, I kind of gave up. Nothing much was selling ... I kept making but no one was buying ... and in the end there are just so many Light Catchers and seaglass pendants that you can make! What on earth do you do with them?


So, last time I went to Durras Lake, back in April last year, I put my shop into vacation mode and just left it!

After getting a little positive feedback though from my Sealights FB page, I thought I'd give it another go.

I've also put myself on a waiting list for a Sea Glass Auction group on Facebook, and am hoping she [Jenelle Aubade, the founder] will let me in as a seller. Noone else seems to make the things I do ~ especially the light catchers that I love making so much, so maybe she will see this as something new.

I was looking at my old work as I relisted and edited my things for Etsy! Most of it was OK, but there were a few items that I didn't relist, as I'd scratched the wire!
You have to love what you do ~ which I do! But you also have to do it well, or it's simply not fair to others, who may be spending their hard-earned dollars on what you make, and be disappointed! I would hate that.
So ... from now on in I'm going to pay really careful attention to the absolute basics, such as scratching the wire, nicks in the bezels ... things like that!

Here is my triumph of the day ... I made this little owl pendant, and was so surprised ... STUNNED ... when I held it up to the strong summer sun! My browns became yellows, and were just so beautiful!


And this is why I  work with seaglass! Is there anything more beautiful than this?


Saturday, 13 December 2014

Shake! Shake! Shake!

Hi there Friends ~

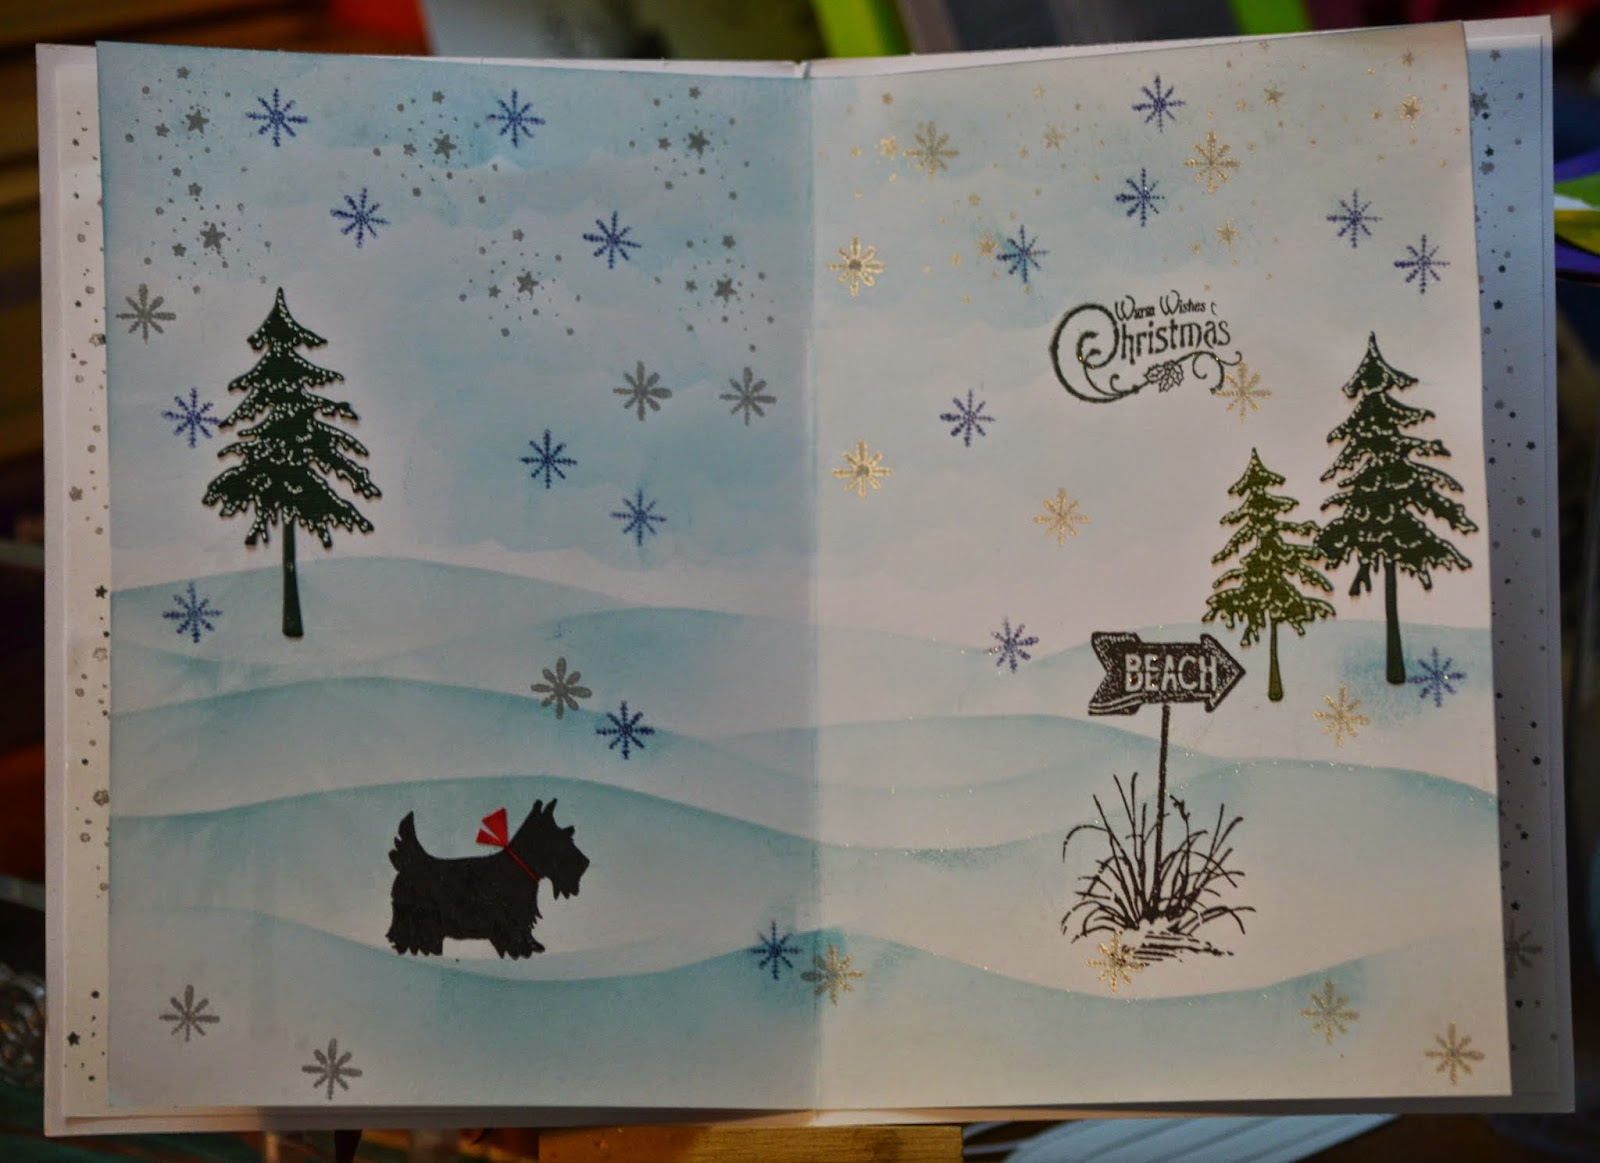
Christmas will soon be here, and as well as my Peace cards, [previous posts] I wanted to post some photos of this shaker card I just finished.

Firstly, let me say that this isn't my idea ... I borrowed this idea for a terrific Youtube video, by a poster called nasahi.

This is the link if you wanted to try this for yourself ...
https://www.youtube.com/watch?v=hmZH7XxrHw0

But here is my version ...

I cut the star using a die, and glued the acetate onto the back of this, ie behind the front of the card.
 
To make the box, you simply add foam mounting tape outside the star, on the back  ... in a rectangular, or 'box' shape. Add the sequins, beads and sparklies, then close the box with what you want to show through the window ... in this case, I used an embossed panel of Swiss dots

You can just see the mounting tape here, underneath the Swiss Dots panel, this is what keeps your beads etc in the 'box'! When you put the card insert over this, it all looks neater.


Cut the panel for the front at the same time you do the star on the front of the card. I didn't do mine in two sections like the lady in the video ... but you can get a good impression on the cover panel if you run both through at the same time. Even if it's not cut right through, run it through the BigShot again to finish it off and it should be in the exact position you need to glue this coloured panel onto the card front. See below.


Add the silver star frame, and whatever embellishments you feel suits your card.


Here are two others that I've just finished! The 'box' that holds the embellishments could be any shape, but square or rectangular seems easiest ... but the front aperture doesn't have to match this . If you can make the 'box' at back fairly close in size to the aperture, but not so close that the tape shows, then your sequins and beads won't get so lost behind there, caught in corners etc.


Thanks so much for visiting my blog ... I hope your lead-up to the festive season is going well.
Try to eliminate as much stress as you can by handing over the worst jobs to others!! Adriana doesn't know it yet but this afternoon she's going to be chasing cobwebs from the outside eaves, and Kieran will be de-sticking the yard!
Always plenty to do when you don't use poisons and have a yard full of gumtrees!

Personalising Cards

Hello  Friends ~
Welcome to my blog.
So close now to Christmas and the New Year! Where did 2014 go?

I think one of my New Year resolutions might be to try and make this blog a little more exciting-looking!
Some of the blogs I visit are fabulous ... filled with colour ... yes, this definitely must go on The List!!

I wanted to share a couple of cards that I've done recently, the first one back in October for a friend's birthday, the second, a Christmas card for a friend in England.
The third, another birthday card for my son's best friend who has spent a lot of time with us over the years. He's an apprentice electrician, so his 21st birthday card was designed around that.

                                     ***    ***    ***    ***    ***    ***    ***    ***    ***

This first card was for a friend who enjoys making cards and is very skilled at this. She is also a quilter ... arranges the music for her church ... and is a midwife at a large local hospital. She has a German Shepherd, and is a generally all-round, lovely person, so I wanted to make something a bit special.

I used Flat Fabio sprays from Lindy's Stamp Gang, and Dylusion Sprays by Ranger, for the background panels. This card was huge ... about  8" x 8" ... but I wanted to fit a lot on it, as she is such a busy person and has so many interests..


Fourteen quilter's hexagons, each one a word especially for her, cut from a Dictionary [copy], and 'stitched' onto the card.


This was the first time I'd used my new Arianna Blooms die and Stamp set from Heartfelt Creations, and I was pleased with the flowers. 

Each word a personal reflection of her life.

I love this musical die cut ... I wish I had more opportunities to use it! The background script stamp is  En Francais, from Stampin'Up.


The insert ... a little stamping and using the sections left from die-cutting the flowers as a stencil. I should have gone over those a second time with a smaller flower. Never mind... next time. The fan edging is a Martha Stewart punch called Deco Shells.

I knew what I wanted to do for this card, but the 'doing of it' was a bit tricky for me, so in the end, even as I was putting it together, much better ways sprang to mind.
I was pleased with the result though.

                                                                  *  *  *  *  *

The second card is for a friend who lives in Durham. His online name has the word 'Scotty' in it, so this gave me the ideas for this card. He also loves the beach and is a seaglass collector.

I've never used sequins before, but am finding they do a great job in 'lifting' an area and adding a bit of bling and sparkle, especially on Christmas cards.

This in the back of the insert [right side] ... when I added the insert, the left side panel was bare ... not for long.

A little Scottie dog heading for the beach through the snow ... yep! Perfect!
                                     
                                                  ***     ***     ***     ***     ***     ***


And this last card was the one I made for my son's best friend. An apprentice electrician, and a thoroughly nice person! This took hours, but was worth every minute!
I hand-cut every single one of those windows with my Craft knife! I didn't have the stamp set then, but bought it soon afterwards. This is the My Hero set from Paper Smooches. A terrific set, their buildings stamp is way better than my cut-and-paste job, but I was glad to have been able to do it! There are also dies of city skylines, and these are DEFINITELY on my list.

'E' words for an 'epprentice' electrician! ... a bit of creative license.


Twenty-one light bulbs, hand drawn and glittered with Wink of Stella pen.


                                           *     *     *     *     *     *     *     *     *     *

I really like personalising the cards I make. You have to know someone either really well, or at least a few things about what they like etc before you can do this, but it's worth the effort, and pretty much guarantees that your card will be kept, at least for a little while, and that's always nice too.

I hope the lead up to your Christmas celebrations is going well.

Sending happy thoughts your way!

Virginia

Wednesday, 12 November 2014

Pink Peace Cards

Hello Friends ~
I've been making a few more cards over the past couple of weeks, and just thought I would share a few of these.
I've duplicated the card from my post, titled 'Peace', and made a couple more ... some in pink [this was meant to be Christmas Crimson!! Ah well ... ] and another done in the blues, but with gold embossing.
I've added poinsettias to some ... a free Penny Black gift with an English magazine called Papercraft Essentials ~ Issue 113.
Those English magazines sure have some terrific gifts. Although we pay more for them here, they certainly pay you back with their freebies.

Here are my latest cards. I hope someone will enjoy looking through them.


Thinking of what to do on the inside of cards is always a chore for me. I guess it may eventually come easier.

On the front of the card, I used die-cut doves, made from about 150gsm card. On the inside though, I used paper ones so they wouldn't have too much substance.


The colours I used in this were Seedless Preserves and a bit of Dusty Concord. Also Archival 'Plum' for the little bits of stencilling. The greenery is from the Martha Stewart punch, 'Twigs' I think it\'s also called 'Branches'?


Here's something a little different! This idea comes from a Youtube video by Jennifer McGuire, who has some wonderful ideas for cards, both Christmas and otherwise. These trees are made by sponging colour [Peeled Paint and Mowed Lawn] through a sectioned-off part of a round stencil. This particular one is called 'Mayan Calendar', by Crafter's Workshop. You just section of a portion of the stencil with tape, and sponge colour through the triangle you've created. Add the trunk and star, and you have a Christmas tree. Cut a curvy mask and sponge some colour on the edge of it to create some snowbanks ~ I used Salty Ocean. I also lightly sponged the sky. Jennifer didn't, and left hers white, but I liked the faint colour for the sky, and after the first one, I did this to all mine. Lastly, heat emboss the sentiment. Oh, and add an insert of course. Mine were plain white with some tiny silver stars across the very top and bottom. You can just see the inserts in the photo below.


And here is my 'Peace' card, done in blue and gold. This sentiment is also from the free Penny Black set that came with Papercraft Essentials Issue 113.

Thank you so much for looking at my cards and visiting my blog.

Sunday, 2 November 2014

Fairies in the Garden

Hi to anyone who visits my blog ~

I thought I'd post some photos of the Fairy cards I've been making lately. Such pretty little stamps they are ~ from Lavinia Stamps, in England.
I don't have a lot of these stamps, but enough now to put a scene together.
Here's what I've been doing ... thank you for visiting!!